作者:唐亚峰 | 出自:唐亚峰博客
原生的
ByteBuffer存在哪些问题呢,Netty为什么会设计ByteBuf呢,它的工作原理是什么…..
ByteBuffer存在的问题
ByteBuffer是JDK1.4中提供的java.nio.Buffer, 在内存中预留指定大小的存储空间来存放临时数据,其他Buffer的子类有:CharBuffer、DoubleBuffer、FloatBuffer、IntBuffer、LongBuffer 和 ShortBuffer
- ByteBuffer的长度是固定的,一旦分配完成,容量就无法动态扩容收缩,分多了会浪费内存,分少了存放大的数据时会索引越界(当传输数据大于初始化长度时,会出现BufferOverflowException索引越界的异常),所以使用ByteBuffer时,为了解决这个问题,我们一般每次put操作时,都会对可用空间进行校检,如果剩余空间不足,需要重新创建一个新的ByteBuffer,然后将旧的ByteBuffer复制到新的ByteBuffer中去
- ByteBuffer中只有通过position获得当前可操作的位置,调用get()方法,返回ByteBuffer[postion]处的值,如果是调用put方法,将数据放入ByteBuffer[postion]的位置
- API功能有限,部分高级功能并不支持,需开发者自己实现,且使用原生ByteBuffer较为困难(不适合小白专业户)
ByteBuf与ByteBuffer的区别
不同
ByteBuf实现原理各不相同,我们先看最基本的ByteBuf与原生的ByteBuffer的区别
ByteBuf buf = Unpooled.buffer(10);
buf.writeBytes("鏖战八方QQ群391619659".getBytes());//扩容算法稍后讲解
System.out.println("Netty:" + buf);
byte[] by = new byte[buf.readableBytes()];
buf.readBytes(by);
System.out.println("Netty:" + new String(by));
System.out.println("//////////////////////////////////////////无耻的分割线//////////////////////////////////////////");
ByteBuffer bf1 = ByteBuffer.allocate(100);
bf1.put("鏖战八方QQ群391619659".getBytes());
System.out.println("JDK:"+bf1);
System.out.println("当前指针:" + bf1.position());
byte[] by1 = new byte[bf1.remaining()];
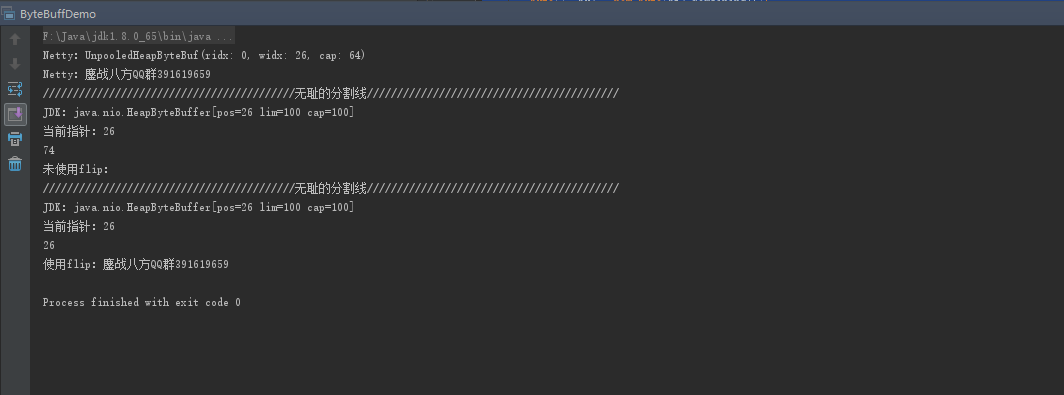
System.out.println(by1.length);//What's 居然是74
bf1.get(by1);
System.out.println("未使用flip:"+new String(by1));//居然是空的
System.out.println("//////////////////////////////////////////无耻的分割线//////////////////////////////////////////");
ByteBuffer bf2 = ByteBuffer.allocate(100);
bf2.put("鏖战八方QQ群391619659".getBytes());
System.out.println("JDK:"+bf2);
System.out.println("当前指针:" + bf2.position());
bf2.flip();
byte[]  by2 = new byte[bf2.remaining()];
System.out.println(by2.length);//是26了
bf2.get(by2);
System.out.println("使用flip:"+new String(by2));//拿到了

指针区别
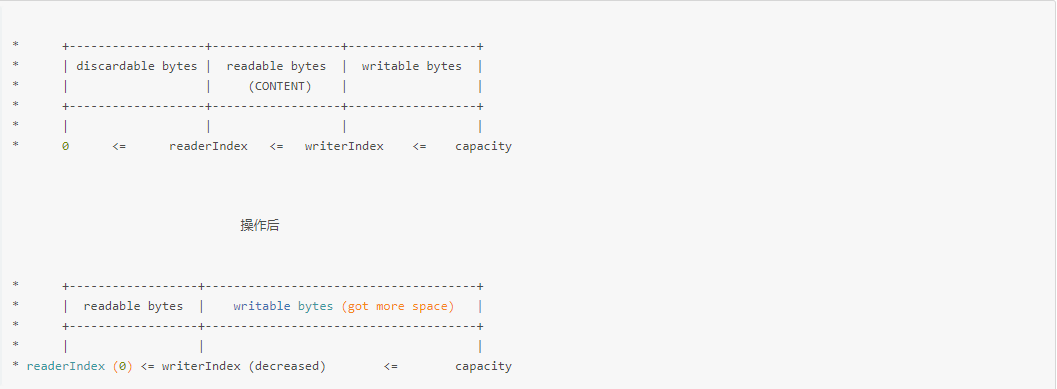
从日志输出中可以看到,使用JDK自带的特别的麻烦,远远没有ByteBuf来的方便,无需关心读写切换指针的问题,在JDK中,由于只有一个一个position指针,我们需要通过flip()进行转换控制,而Netty却可以很好的帮我们做到扩容,它的内部维护了readerIndex与writerIndex两个指针,一开始都是0,随着数据的写入writerIndex会增加但不会超过readerIndex,当我们读取后内部会通过调用discardReadBytes来释放这部分空间,类似ByteBuffer的compact方法,readerIndex与writerIndex都是可读取的,等同ByteBuffer中position -> limit之间的数据,WriterIndex和capacity之间空间是可写的,等同ByteBuffer中limit -> capacity
前面说到过,
JDK自带的ByteBuffer无法做到自动扩容,当内容超出的时候会抛出索引越界的异常,接下来看一段代码
ByteBuf buf = Unpooled.buffer(10);
buf.writeBytes("鏖战八方QQ群391619659".getBytes());//扩容算法稍后讲解
System.out.println(buf);
System.out.println("//////////////////////////////////////////无耻的分割线//////////////////////////////////////////");
ByteBuffer buffer = ByteBuffer.allocate(10);
buffer.put("鏖战八方QQ群391619659".getBytes());
System.out.println(buffer);

**问题:**为什么Netty的ByteBuf没有报错,capacity为什么会自动扩容呢?扩容的大小是怎么计算的?
@Override
public ByteBuf writeBytes(byte[] src) {
    writeBytes(src, 0, src.length);
    return this;
@Override
public ByteBuf writeBytes(byte[] src, int srcIndex, int length) {
    ensureAccessible();
    ensureWritable(length);
    setBytes(writerIndex, src, srcIndex, length);
    writerIndex += length;
    return this;
@Override
public ByteBuf ensureWritable(int minWritableBytes) {
    if (minWritableBytes < 0) {
        throw new IllegalArgumentException(String.format(
                "minWritableBytes: %d (expected: >= 0)", minWritableBytes));
    }
    if (minWritableBytes <= writableBytes()) {
        return this;
    }
    if (minWritableBytes > maxCapacity - writerIndex) {
        throw new IndexOutOfBoundsException(String.format(
                "writerIndex(%d) + minWritableBytes(%d) exceeds maxCapacity(%d): %s",
                writerIndex, minWritableBytes, maxCapacity, this));
    }
    // 默认64     当前大小 <<= 1 翻倍
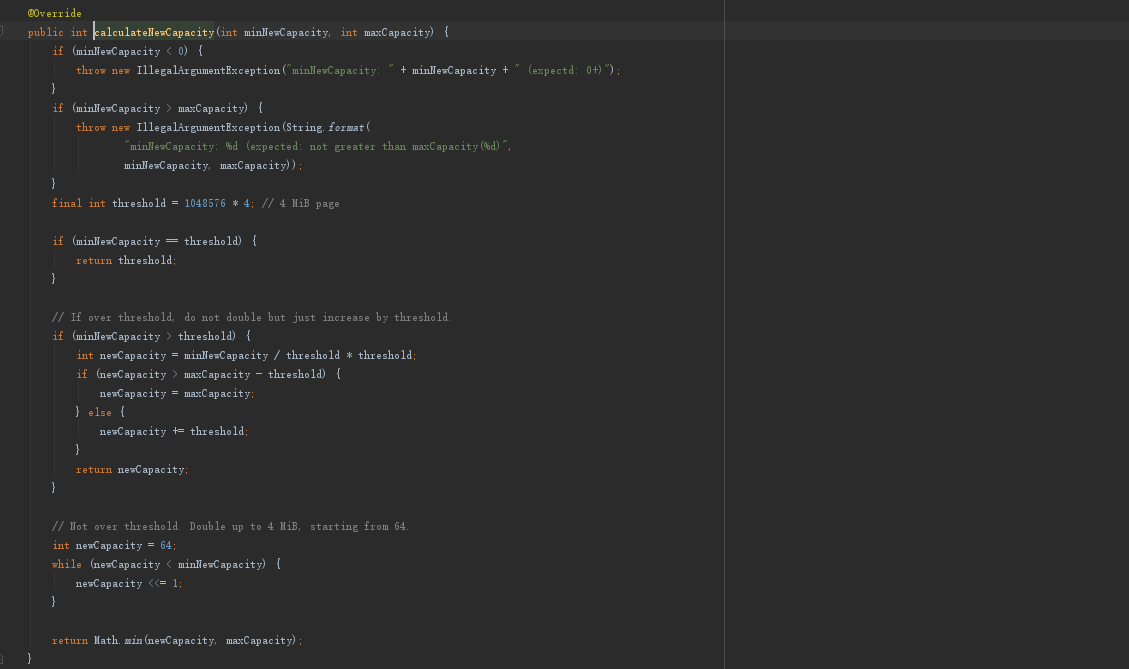
    int newCapacity = calculateNewCapacity(writerIndex + minWritableBytes);
    // Adjust to the new capacity.
    capacity(newCapacity);
    return this;
}

扩容分析
- 调用writeBytes方法后,ByteBuf会修改writerIndex的指针大小,然后判断最小写入字节是否大于0,如果都没内容这不是在玩它么(^▽^)
- 接下来是最小写入字节小于或者等于剩余容量,那就返回当前的ByteBuf,也就不会扩容了,因为能装得下
- 接下来继续判断最小写入字节是否大于当前ByteBuf最大容量 – 已使用容量,如果最大容量都装不下说明这已经没法继续玩了,只能装这么多,扩容不了
- 最后就是扩容处理了,Netty的做法是默认64字节,小于阀值取64,大于取64 `<<= 1,成倍递增
相比其它的JAVA对象,缓冲区的分配(包括动态扩容)与释放是一个耗时操作,因此需要尽可能的复用
@Override
public ByteBuf discardReadBytes() {
    ensureAccessible();
    if (readerIndex == 0) {
        return this;
    }
    if (readerIndex != writerIndex) {
        setBytes(0, this, readerIndex, writerIndex - readerIndex);
        writerIndex -= readerIndex;
        adjustMarkers(readerIndex);
        readerIndex = 0;
    } else {
        adjustMarkers(readerIndex);
        writerIndex = readerIndex = 0;
    }
    return this;
}
public final Buffer clear() {
    position = 0;
    limit = capacity;
    mark = -1;
    return this;
}
回收区别
在Netty中,ByteBuf可以通过调用discardReadBytes进行回收,需要注意的是,字节数据会发生内存复制,所以频繁调用会导致性能不升反而下降,因此使用之前需要确保是否需要这样处理(性能换运能自我取舍),而ByteBuffer的回收就比较简单,直接将指针初始化,ByteBuffer的读写都为0

ByteBuf API
查询操作
indexOf(int fromIndex, int toIndex, byte value):从当前ByteBuf中定位首次出现value的位置,起始索引为fromIndex,终点是toIndex,如果未检索到返回-1否则返回结果的索引位置
bytesBefore(byte value):从当前ByteBuf中定位首次出现的位置,默认readerIndex开始到writerIndex结束
bytesBefore(int length, byte value):默认readerIndex开始到readerIndex+length结束
bytesBefore(int index, int length, byte value):从指定index开始,到readerIndex+length结束
forEachByte(ByteBufProcessor processor):遍历当前ByteBuf可读字节数组,与ByteBufProcessor设置的条件做对比,满足返回索引位置,否则返回-1
forEachByteDesc(ByteBufProcessor processor):倒序迭代,与ByteBufProcessor设置的条件做对比,满足返回索引位置,否则返回-1
孵生
ByteBuf的几种姿势
duplicate():返回当前ByteBuf复制的对象,复制后共享缓冲区内容,各自独立读写索引,但是当复制的ByteBuf内容发生改变时,原ByteBuf也会随之改变
copy():复制一个新的ByteBuf对象,完全独立,不存在共享
slice():返回当前ByteBuf的可读子缓冲区,默认readerIndex到writerIndex,内容共享,独立读写索引,但操作并不会影响到原ByteBuf的readerIndex和writerIndex
ByteBuf转java.nio.ByteBuffer
nioBuffer():将当前ByteBuf可读的缓冲区转换成ByteBuffer,二者共享一个缓冲区内容引用,但是对ByteBuffer读写操作不会修改原ByteBuf的读写索引,同时ByteBuffer也无法感知ByteBuf的动态扩容
nioBuffer(int index, int length):从ByteBuf指定位置开始长度的缓冲区转换成ByteBuffer
– 说点什么
全文代码:https://gitee.com/battcn/battcn-netty/tree/master/Chapter10-1/battcn-netty-10-1-1